Welcome to our Knowledge Base
Add Event
-
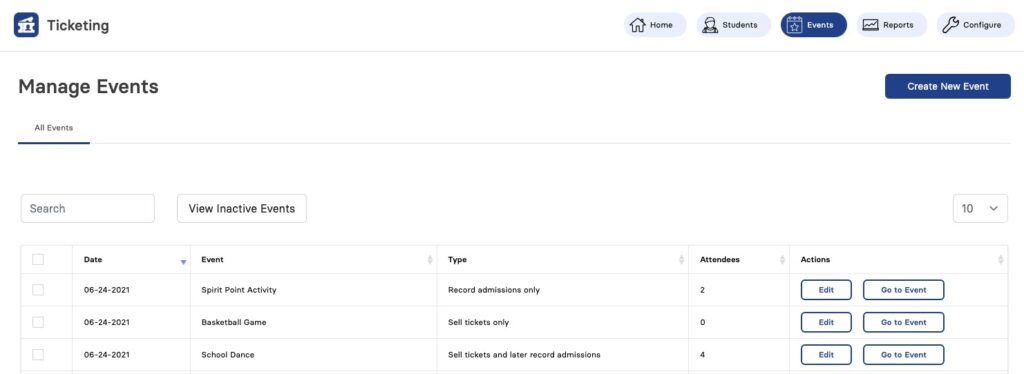
To add a new event, click on the Create New Event button.
-
You can edit the existing events by clicking on the Edit button against the desired event.
To access the events, click on the Events button available at the top bar.
-
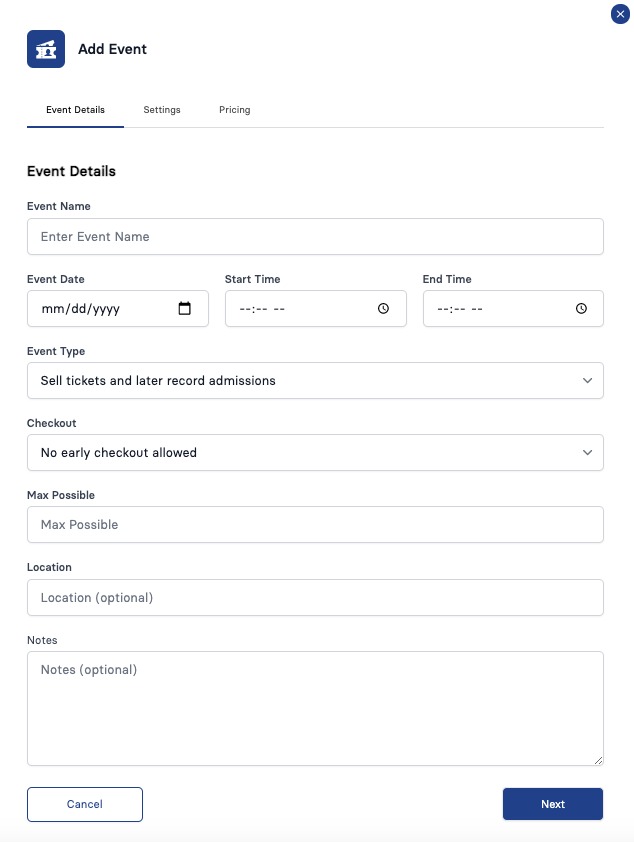
Select the Event Details tab.
-
Event Name – select a short and easy to remember name of the event.
-
Event Date & Time – Using the date picker control, select the date of the event. You can also specify the Start and End Time.
-
Event Type – Select appropriate event type from the list.
-
Checkout – You can select one of the following:
No early checkout allowed. This means any students being scanned to LEAVE an event early will trigger a warning to you.
Early checkout allowed. Students may leave the event early but must show an ID card and be scanned out. For security reasons you need to know who is in the event and who left early.
Early checkout and readmission allowed.
System will not restrict or trigger the warning. Students may be allowed for early checkout and readmission. -
Max Possible – Set a value equal to the total number of students that could come to the event. Selected value will also be reflected on the bar graph available at the Dashboard.
-
Location & Notes are optional and you can enter information for your record only.
When you click on the Create New Event button, a window will open where you can enter details related to the new event.

-
Do you want student type to determine ticket price?
Use Ticket Type to automatically set the price for a ticket. This is often used if your school sells a “dance pass” at the beginning of the school year and then students that purchase that pass get discounted or free tickets. When this is on, the price will be automatic for students and guests. When this is off, the user can select the ticket type / price. Learn more
-
Do you want to exclude students with no permission from this event?
When this is turned on, students that have been set with an exclusion will not be allowed to purchase a ticket or check-in to an event. When this is off, the student exclusions will be ignored. Learn more
-
Allow students from all grade levels?
When this is turned on, all students are allowed to attend the event. When you turn this off, only students in grade levels you select will be able to attend.
-
Do you want to enforce pre-registration, even if the price is set to $0.00?
If the ticket price for a student is set to $0.00 and you are using the sell tickets and record admissions setting, then a student must purchase a ticket for no cost or they can not check-in. This can be helpful if a student needs to turn in a permission slip or dance pass before the event.
-
Do you want to be able to sell tickets to guests who have no student ID?
When this is turned on, the system will allow you to sell a guest ticket. The next few options can be configured when this is turned on.
-
What is the maximum number of guest tickets per student?If you allow guest tickets you can set the maximum number of tickets that a student can purchase when you connect the guest to the “Host” student.
-
Do you want to restrict guest tickets to be linked to a “Host” Student?
When this is turned on you can only sell guest tickets that are linked to a student at the school. This option is best used so you don’t accidentally sell a guest ticket without linking it back to a student. When this is turned off, you can sell guest tickets that are not linked to a student.
-
Do you want to Sell Tickets at the Door (Ticket & Check-in)?
When this is turned on, you will have the option on the day of the event to sell a ticket and check the student in at the same time. This only works if the current date matches the event date and you will see the options on the sell ticket screen.
-
Do you want to sell tickets online?
When you are using the online portal to sell tickets, turning this on will allow you to sell tickets on your schools personalized online portal. Learn more
-
What is the last day tickets will be available for online purchases?
If you are selling tickets on the web portal, then you can set the last date that they can be purchased online.
-
Do you want to apply Spirit Points?
When you have Spirit Points turned on, you can give students points when they are checked into an event. Learn more
-
How many points per check-in?
When Spirit Points is being used, enter the number of points students will receive when they check in.
Depending on the Event Type you select from the first page you will see different options here. This screenshot was from Sell Tickets and Record Admissions.
-
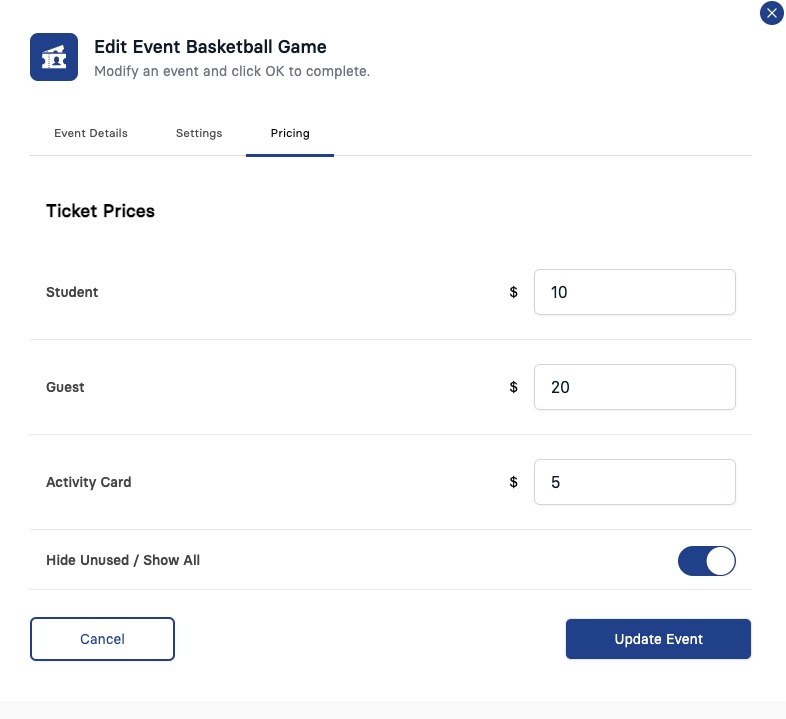
You can specify the ticket prices for Student, Guest and Activity Card.
-
Select this toggle button if you want to Hide Unused or Show All.
-
Review the changes done and click on the Update Event button to save in the system.
To edit an event details, all you need to do is click on the Edit button available in the Manage Events page. In this section, we are covering updating the ticket pricing.