Welcome to our Knowledge Base
Printer Setup – 3″ Thermal (Mac) **Advanced Setup**
The process for setting up a printer on a Mac is very technical. The steps below are documented clearly, but if you have IT staff on your campus we recommend that you have them go through this process.
Adding a printer on a Mac ** Advanced **

Visit http://java.com/verify/ to confirm Java is installed and running properly. You must be on Firefox or Safari browser to confirm the same.
Terminal

Open a Terminal window: ⌘+space, terminal, enter.
Enable CUPS web interface by entering this into the Terminal:
sudo cupsctl WebInterface=yes
CUPS
Open the Safari browser to the CUPS web interface http://localhost:631 and click The Administration tab, then Add Printer.

1. You will be prompted for a port For USB printers type:
2. Go back to your Terminal and type
lpinfo -v |grep usb
3. Your results should look like one of the following.
usb://CITIZEN/CT-S2000?serial=00000000
usb://Zebra/LP2844?location=1a200000
4. If it has a location, please leave that off so in the examples above you would use one of the following.
usb://CITIZEN/CT-S2000?serial=00000000
usb://Zebra/LP2844
Connection

Copy and paste into the Connection: text box.
Printer Name

1. Enter an appropriate Name, Description and Location for your printer. If Citizen or Zebra, you can still use the same naming convention as above. Do not share the printer.
2. Click Continue.
Printer Manufacture

Select: Raw and click Continue.
Summary

You will now see a summary of your settings, click Click Add Printer.
Banners

Starting Banner: none
Ending Banner: none
Click Set Default Options
Add Class

Now we need to add a Printer Class to make the printer appear in System Preferences, Print & Scan.
Under the Administration tab click Add Class

1. You might be prompted for a user name and password. This is your computer Admin login user name and password.
Note: If you see your USB raw printer in the listing DO NOT select it.
3. Select AppSocket/HP JetDirect.
4. Click Continue.
Add Class Info

-
Enter a Name, Description, and Location for your class. It must be different from the raw printer name chosen previously. Also The class name may only contain up to 127 printable characters and may not contain spaces, slashes (/), or the pound sign (#). Important here you will need to make a change. We default the printer name in your application so you will need to make sure you update the name in the application to match what you put here. We suggest just CTS2000
-
In Members, Select the printer name you created previously
-
Click Add Class.

Go to your System Preferences, Printers & Scanners and you should see your new printer here. You can change the printer name, but this must match what is in your application under printer name.
Printer Settings in Software 4 Schools
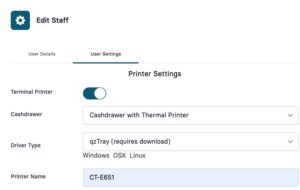
To access the settings, click on the System Settings option available at the bottom-left on your screen. Now select Users.
At the Users page, click on the Edit Users and a pop-up window will open. Select the tab for Users Settings.
Make sure that you download the driver file by clicking on the text.
Install qzTray

After you download and install the file qzTray file provided, be sure open the application found in the top right corner where your running apps are and set the program to Automatically Start
Printing
