Welcome to our Knowledge Base
Accessing the Open Store Portal

-
Click the Filters across the top to view specific categories
-
Click an Active Product to add it to your cart
-
Products that are out of inventory will show on the screen, but cannot be clicked or added to the cart
-
Price on Demand items require you to enter an amount before clicking the button. (For example if you need to pay a library fine, you can enter the amount of your fine and click the button to add it to your cart.)
-
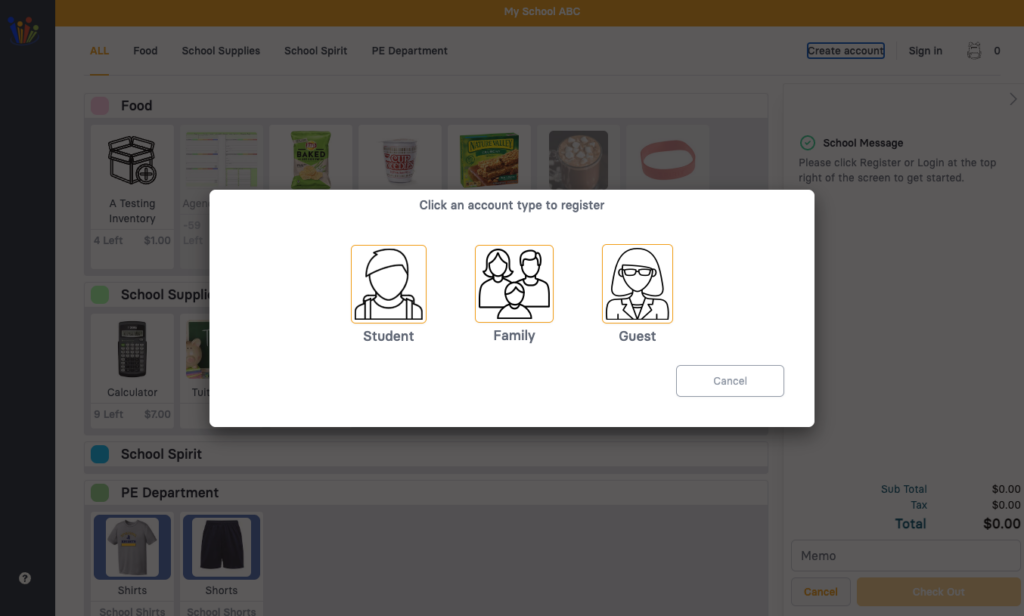
Click Create Account or Sign In to check out or view details in your account.
-
Student – To create a Student Account you must be an active student in the school. Click Student to register, you will be required to know you first name, last name, student ID number and you can set your own email and password to use with the account.
-
Family – A Family account allows a parent or guardian to link their account to multiple students at the school. After you create your family account you can click on the Add Student button to link to students at the school. You are required to now the first name, last name and student ID number for the students you are adding.
-
Guest – A guest account is not linked to any kids and designed for alumni, relatives and family friends. This account allows you to type the name of a student to reference, however you do not need to know the student ID number and will not have access to any purchase history for students.
-
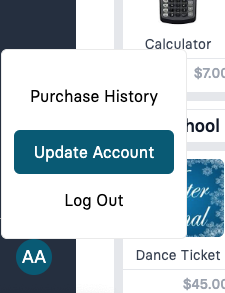
Purchase History – This will display all your recent transactions and details
-
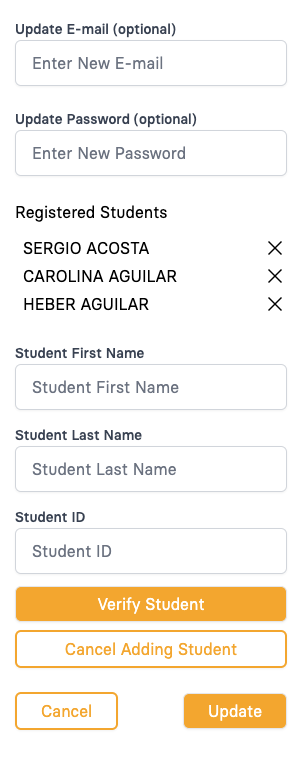
Update Account – This will allow you to update you email and or password. (If in a family account you can also add or remove students)
-
Log Out – When you have completed your session we recommend that you log out for security
Clicking on your initials in the bottom left corner will bring up the settings menu

-
Points (If your school has this feature turned on) will allow you to make purchases using those points. Just select points from the drop down menu above the cart and you will see items that you can purchase using your points.
-
Store Credit (if your school has this turned on) will allow you to add credit to your account that can be spent online and in person. Clicking on the Credit button will allow you to add additional credit.

-
Points (If your school has this feature turned on) will allow students to make a purchase using those points. Family accounts can not make a purchase with those points.
-
Store Credit (if your school has this turned on) will allow you to add credit to your account that can be spent online and in person. Clicking on the Credit button will allow you to add additional credit.
A family account will allow you to link to multiple students. In the drop down you can select any student you wish to make a purchase for.
-
Registered Students – This section will display your currently registered students. To remove a student, click the X
-
Add Students – To link to additional students, enter the student first name, last name and student ID number and click Verify Student.
Clicking on your initials (bottom left) then clicking on Update Account will open up this menu.

-
Guests will only see their name in this section.
A Guest Account will not give you any of the above options such as store credit and points.