Welcome to our Knowledge Base
-
System Settings
-
- Articles coming soon
-
- Upload Students (Video)
- Upload Students
- Manage Students
- Upload Student Pictures
- User Accounts
- Upload User Accounts
- User Permissions
- Mass Updates
- Manage Family and Guests
- Printer Setup - 3" Thermal (Windows)
- Printer Setup - 3" Thermal (Mac) **Advanced Setup**
- Printer Setup - 3" Thermal Network (Mac) **Advanced Setup**
- Preparing for Next School Year
- Microsoft Single Sign-On (SSO)
-
Store
-
- Articles coming soon
-
- Creating a Transaction
- Scanning a Student ID
- Student Credit
- Student Credit - Credit Refunds
- Product Buttons
- Returns
- Printing Receipts
- Payment Type
- Modify Transaction - Post Sale
- E-mail Receipts
- ProPay: How to Void a Transaction
- ProPay: How to Process Credit Cards
- Reprint Receipt and Resend Receipt by E-mail
- Exporting Ticket Sales from Store to Ticketing for Checkin
- Changing Payment Type After Transaction has Completed
- Portal Purchased Product Pickup and Reports
- Discount Options
- PAX Credit Card Reader Setup
- Show all articles ( 3 ) Collapse Articles
-
- Upload Students (Video)
- Upload Students
- Upload Student Pictures
- Student Type
- Student Spirit Points
- Student Credit
- Upload Student Credit
- Managing Student Credit
- Student Credit - Credit Refunds
- Manage Spirit Points
- Mass Updates
- Discount Options
- Manage Students
- Family and Guest Management
- Manage Family and Guests
-
- Accessing the Open Store Portal
- Accessing the Student Only Store Portal
- Family and Guest Management
- Configure your Portal and Products
- Portal Purchased Product Pickup and Reports
- Manage Family and Guests
- ProPay (Heartland) Merchant Account
- Google Single Sign-On (SSO)
- Family Portal
- Microsoft Single Sign-On (SSO)
-
- User Accounts
- Upload User Accounts
- User Permissions
- Taxes
- Paysafe: PCI Compliance
- Cash Drawer (Connected to Thermal Printer)
- Cash Drawer (USB) Windows 10
- Product History (Link on Current Transaction)
- Product Agreement
- Accessing the Student Only Store Portal
- Configure your Portal and Products
- Portal Purchased Product Pickup and Reports
- My Account
- SFTP Automated Student Rosters
- Accessing the Open Store Portal
- ProPay (Heartland) Merchant Account
- School Logo
- PAX Credit Card Reader Setup
- Whitelist URL's
- Show all articles ( 4 ) Collapse Articles
-
- System Settings Getting Started (Video)
- User Accounts
- User Permissions
- Upload User Accounts
- Upload Student Pictures
- Remote Support
- Mass Updates
- ProPay (Heartland) Merchant Account
- School Logo
- Google Single Sign-On (SSO)
- PAX Credit Card Reader Setup
- Preparing for Next School Year
- Microsoft Single Sign-On (SSO)
-
Voting
-
- Adding an Election
- Adding Officer Positions
- Adding Candidates
- Election Preflight
- Removing Candidates
- Adding Pictures and Biographies
- Archive and Retrieve Old Elections
- Duplicate an Election
- Using Video Biographies
- Election Layout Options
- Preview an Election
- Write-in Candidates
- Create a Survey (Video)
-
- User Accounts
- User Permissions
- Upload User Accounts
- Configure the Student Login Page
- Require Student E-mail
- Notifications for Unsuccessful Student Login Attempts
- Hobbies and Biography
- My Account
- Require Change Passwords
- SFTP Automated Student Rosters
- Google Single Sign-On (SSO)
- School Logo
- Whitelist URL's
-
Ticketing
-
Interventions
-
- Articles coming soon
-
- User Accounts
- Upload User Accounts
- User Permissions
- Printer Setup - 3" Thermal (Windows)
- Printer Setup - 3" Thermal (Mac) **Advanced Setup**
- Printer Setup - 3" Thermal Network (Mac) **Advanced Setup**
- Interventions
- Bell Schedules
- My Account
- SFTP Automated Student Rosters
- School Logo
- Mass Updates
- Whitelist URL's
-
Announcements
-
Student / Family Portal
-
Digital ID
Uploading Multiple Voting Groups

-
The first step in creating multiple voting groups is to get a file that has all the data points that you want to use to separate out your voters. In this example, we are going to combine Gender and Grade so we can have 11th grade females in one group and 11th grade males in another.
In this article, you will learn how to upload multiple voting groups.

-
Create a new column (for example “combined”) and then put your curser in the first row of data and click the Function (fx) Icon.
-
Search for Concatenate and click enter.

-
For Text1 click the first cell (in my example D2 under grade) and for Text2 click the next cell (in my example E2 under gender) and click done.

-
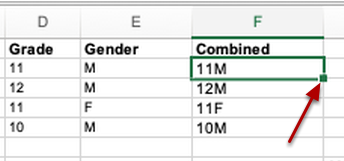
You should now see the combined data in one cell in the new column. Next click the small square box in the bottom right corner and drag down the entire file so it copies the formula.

-
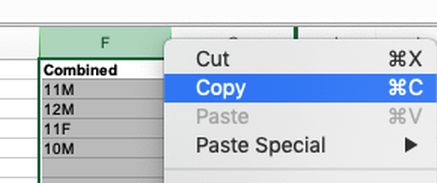
Highlight the entire column (F in my example), right click and select Copy.

-
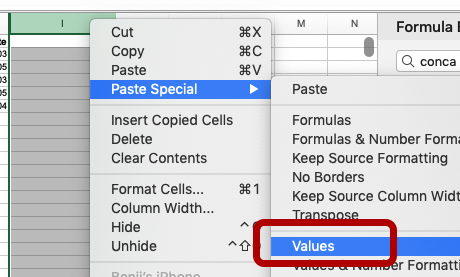
Very important – We are now taking the formula and turning into raw data that can be imported. Fine a new blank column, click the header and select Paste Special and select Values and that will duplicate the data in a new column. The difference is that when you click on the data it will show in the formula cell and if you click on the original column (F) it shows the formula.

-
You can now delete the original columns (in my example Grade, Gender and Combined) and this will now leave me with just the new column that has the raw data. Be sure to keep the new combined data (in my example column I )

-
The best way to upload your file is to use a CSV file. So go Save As and choose the option CSV.

-
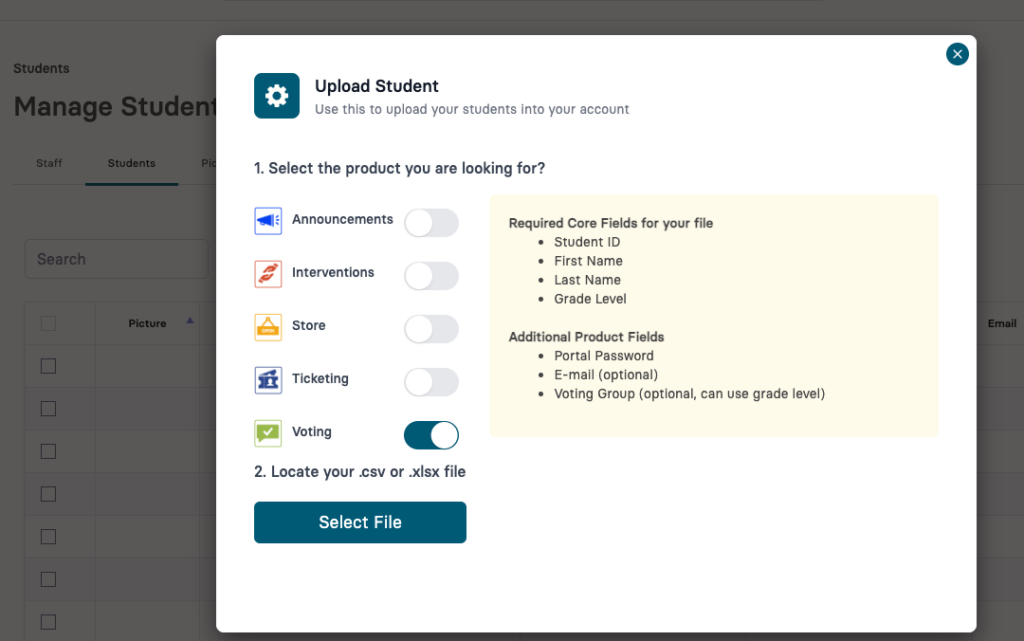
Next you go log into your voting account System Settings / Users / Students and Upload your file. Be sure to line up the columns by selecting the correct column in the drop down to match the fields. Learn more about uploading students
