Welcome to our Knowledge Base
-
System Settings
-
- Articles coming soon
-
- Upload Students (Video)
- Upload Students
- Manage Students
- Upload Student Pictures
- User Accounts
- Upload User Accounts
- User Permissions
- Mass Updates
- Manage Family and Guests
- Printer Setup - 3" Thermal (Windows)
- Printer Setup - 3" Thermal (Mac) **Advanced Setup**
- Printer Setup - 3" Thermal Network (Mac) **Advanced Setup**
- Preparing for Next School Year
- Microsoft Single Sign-On (SSO)
-
Store
-
- Articles coming soon
-
- Creating a Transaction
- Scanning a Student ID
- Student Credit
- Student Credit - Credit Refunds
- Product Buttons
- Returns
- Printing Receipts
- Payment Type
- Modify Transaction - Post Sale
- E-mail Receipts
- ProPay: How to Void a Transaction
- ProPay: How to Process Credit Cards
- Reprint Receipt and Resend Receipt by E-mail
- Exporting Ticket Sales from Store to Ticketing for Checkin
- Changing Payment Type After Transaction has Completed
- Portal Purchased Product Pickup and Reports
- Discount Options
- PAX Credit Card Reader Setup
- Show all articles ( 3 ) Collapse Articles
-
- Upload Students (Video)
- Upload Students
- Upload Student Pictures
- Student Type
- Student Spirit Points
- Student Credit
- Upload Student Credit
- Managing Student Credit
- Student Credit - Credit Refunds
- Manage Spirit Points
- Mass Updates
- Discount Options
- Manage Students
- Family and Guest Management
- Manage Family and Guests
-
- Accessing the Open Store Portal
- Accessing the Student Only Store Portal
- Family and Guest Management
- Configure your Portal and Products
- Portal Purchased Product Pickup and Reports
- Manage Family and Guests
- ProPay (Heartland) Merchant Account
- Google Single Sign-On (SSO)
- Family Portal
- Microsoft Single Sign-On (SSO)
-
- User Accounts
- Upload User Accounts
- User Permissions
- Taxes
- Paysafe: PCI Compliance
- Cash Drawer (Connected to Thermal Printer)
- Cash Drawer (USB) Windows 10
- Product History (Link on Current Transaction)
- Product Agreement
- Accessing the Student Only Store Portal
- Configure your Portal and Products
- Portal Purchased Product Pickup and Reports
- My Account
- SFTP Automated Student Rosters
- Accessing the Open Store Portal
- ProPay (Heartland) Merchant Account
- School Logo
- PAX Credit Card Reader Setup
- Whitelist URL's
- Show all articles ( 4 ) Collapse Articles
-
- System Settings Getting Started (Video)
- User Accounts
- User Permissions
- Upload User Accounts
- Upload Student Pictures
- Remote Support
- Mass Updates
- ProPay (Heartland) Merchant Account
- School Logo
- Google Single Sign-On (SSO)
- PAX Credit Card Reader Setup
- Preparing for Next School Year
- Microsoft Single Sign-On (SSO)
-
Voting
-
- Adding an Election
- Adding Officer Positions
- Adding Candidates
- Election Preflight
- Removing Candidates
- Adding Pictures and Biographies
- Archive and Retrieve Old Elections
- Duplicate an Election
- Using Video Biographies
- Election Layout Options
- Preview an Election
- Write-in Candidates
- Create a Survey (Video)
-
- User Accounts
- User Permissions
- Upload User Accounts
- Configure the Student Login Page
- Require Student E-mail
- Notifications for Unsuccessful Student Login Attempts
- Hobbies and Biography
- My Account
- Require Change Passwords
- SFTP Automated Student Rosters
- Google Single Sign-On (SSO)
- School Logo
- Whitelist URL's
-
Ticketing
-
Interventions
-
- Articles coming soon
-
- User Accounts
- Upload User Accounts
- User Permissions
- Printer Setup - 3" Thermal (Windows)
- Printer Setup - 3" Thermal (Mac) **Advanced Setup**
- Printer Setup - 3" Thermal Network (Mac) **Advanced Setup**
- Interventions
- Bell Schedules
- My Account
- SFTP Automated Student Rosters
- School Logo
- Mass Updates
- Whitelist URL's
-
Announcements
-
Student / Family Portal
-
Digital ID
Detention Call Lists
In this article, you will learn how to use the Detention Call List report. It is part of a comprehensive set of Detention reports.
Detention Call List

-
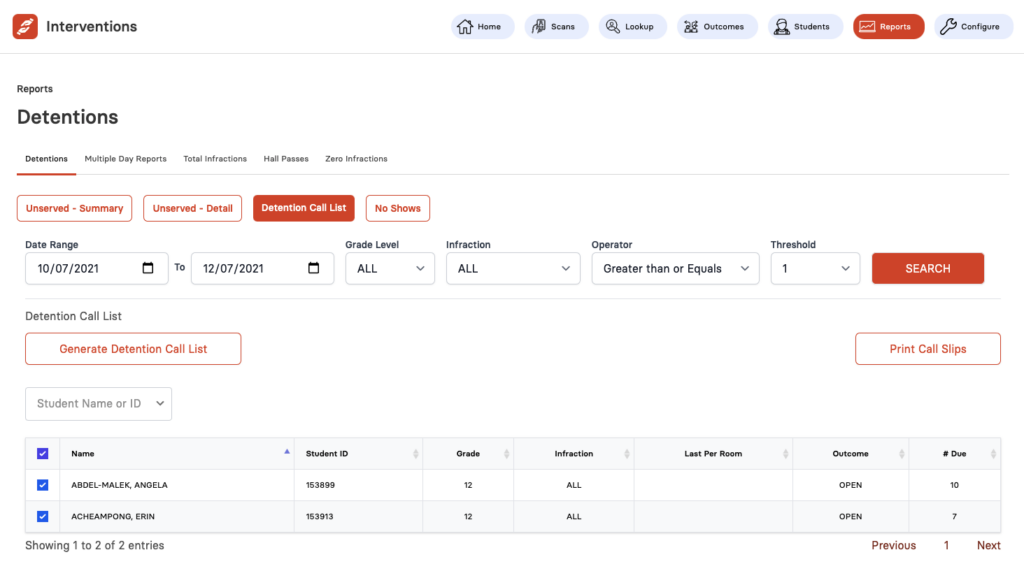
From the available options, click on the Detention Call List button.
-
Use the search filters to narrow down the results of the multiple day report. You can select Date Range criteria, Grade Level, Infraction along with Operator and Threshold using the dropdown menus.
-
Once you have selected the search criteria, click on the Search button.
-
You can click the Generate Detention Call List button to generate a list. Using this list you can get the students and lead them to detention. Read below for more details.
-
To print the call slips, click on the Print Call Slips button. Read below for more details.
To access, click on the Reports icon available at the top bar and select the tab for Detentions.
Print Detention Call List
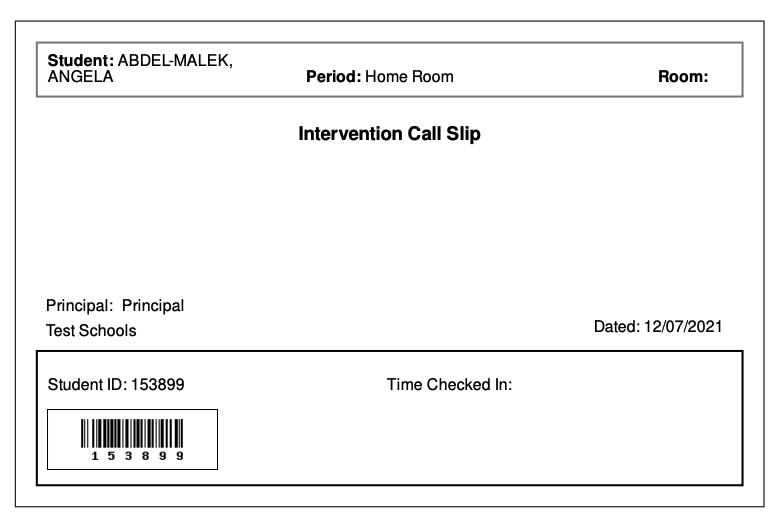
Print Call Slips

-
Complete Student name is displayed.
-
This will display Period depending on the System Value “Last Period Location”, under Settings and the information related to Room provided while uploading the student data.
-
Name of the School Principal.
-
Date is automatically generated by the system.
-
Student ID as stored in the system is displayed. A barcode is also generated which can be used to scan the student into detention.
-
This is a manual entry field. The Detentions Supervisor should collect the Call slips from the students and write the approximate time they came into detention. Plus any other notes.

